DIY Tassel Earrings

I'm hosting monthly craft sessions at my apartment, starting this month with tassel earrings. It was amazing to me how many strings got tangled and tied into knots, but these ladies stuck it out and made some awesome earrings!

Here is how you can do it at home. ​

Supplies:​

  1. 4 packs of embroidery thread from Michaels. I used satin for mine.
  2. Scizzors, sewing needle, index card
  3. Ear hooks. We used 14k gold plated from Rio Grande​

First step is to make 8 total tassels, 4 for each earring. This is the hardest part, but there are lots of resources online on how to make tassels. My favorite is here: 

We made a lot of earrings so we had much more thread than one pair would call for. Each pack of thread is approx $0.50 each. 

IMG_4933.JPG

Cut an index card 1.5" wide. Position a length of thread across the top of the card and wrap the thread 30x around it. Keep in mind that this will be your tassel length and width. 

IMG_4931.JPG

Once complete, tie your loose thread in a double knot at what will be the top of your tassel.  

IMG_4930.JPG

Slide the tied loop off of the index card.  

IMG_4929.JPG

Pinch the top of the tassel where your initial knot was tied and proceed to wrap the head of the tassel with a new piece of thread, as shown in the video link above. You can also simply tie and wrap, but this does not look as clean as the method shared above.  

IMG_4928.JPG

Once wrapped, slide your scizzors into the bottom of the loop, cut and trim the threads.  

IMG_4927.JPG

The tassel is now complete! Repeat 7 more times. 

Once all tassels have been made, thread your needle, knot the end of your thread, and run the line of thread from bottom to top of each tassel sequentially, until you have a string of four tassels. 

Once all tassels have been made, thread your needle, knot the end of your thread, and run the line of thread from bottom to top of each tassel sequentially, until you have a string of four tassels. 

Almost finished..! 

IMG_4926.JPG

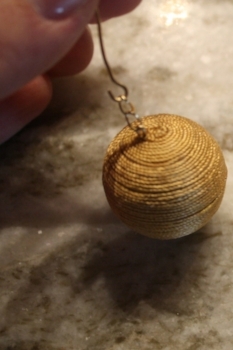
Last step - Stitch the ear hook to the top of each earring. 

IMG_4923.JPG

Here are the finished earrings we made using a variety of colors and thread materials. 

IMG_4922.JPG

DIY Les Bonbons Earrings

I love homemade gifts and for Christmas 2015 I made candles and pins. This year I took on the overly ambitious project of making earrings, similar to Les Bonbons by Rebecca De Ravenel that are available for purchase here: https://rebeccaderavenel.com/. It was harder than it looked, so unfortunately I did not finish in time for Christmas, but alas - I am now complete and here are the results!

A labor of love, my friends!

A labor of love, my friends!

For this project the supply list is incredible, because it is cheap and basic. You will need:
1) Styrofoam balls (4 / pair): I used 1" smoothfoam balls found here, http://www.smoothfoam.com/product/balls/10010.html
2) Styrofoam half balls (2 / pair): I used 1" half smoothfoam balls found here, http://www.smoothfoam.com/product/10612.html
3) Gold acrylic paint, or color to match silk thread
4) Gold silk thread, or color to match paint
5) Clip-on earring flat back findings: I used something like these, http://www.firemountaingems.com/itemdetails/h20b4401fn
6) Gold wire, jump rings or chain: can also find at Fire Mountain Gems
7) Needle-nosed pliers, wire cutter (for jewelry), Glue, Toothpicks.... scissors, and, that's it!

The first step is to drive a hole through your smoothfoam balls with a toothpick and paint them gold. You can use the toothpick to hold the ball in place as you paint.

Painting the smoothfoam ball gold with acrylic paint.

Painting the smoothfoam ball gold with acrylic paint.

I ended up painting a few different sizes to experiment. The larger balls, 1" diam., were my fave.

I ended up painting a few different sizes to experiment. The larger balls, 1" diam., were my fave.

Smearing on glue with a free toothpick and tucking the tail of the silk cord in place - glue and wrap.

Smearing on glue with a free toothpick and tucking the tail of the silk cord in place - glue and wrap.

Keep gluing, keep wrapping and watch out for dirty fingers!

Keep gluing, keep wrapping and watch out for dirty fingers!

Halfway through and looking good.

Halfway through and looking good.

Beads taking shape...

Beads taking shape...

Once you reach the end, tuck in the string with some glue and let dry.

Once you reach the end, tuck in the string with some glue and let dry.

If you are still with me, you are golden. The hard part is done!

Repeat steps above with your half smoothballs.

Repeat steps above with your half smoothballs.

Time to assemble. Using a headpin or gold wire (as pictured), use a needle nosed plier to loop the end. This is to keep the bottom bead in place.

Time to assemble. Using a headpin or gold wire (as pictured), use a needle nosed plier to loop the end. This is to keep the bottom bead in place.

Using the needle-nosed pliers, make a loop.

Using the needle-nosed pliers, make a loop.

Attach a short length of chain. I ended up only using one single loop.

Attach a short length of chain. I ended up only using one single loop.

Put it all together! Yes, it is possible. :)

Put it all together! Yes, it is possible. :)

Apply glue to your half smoothball and cover with felt circle backing.

Apply glue to your half smoothball and cover with felt circle backing.

Glue on the clip-on with tacky glue and assemble. These earrings weigh almost nothing!

Glue on the clip-on with tacky glue and assemble. These earrings weigh almost nothing!

Finished product!

Finished product!

So I appreciate that this project is probably too hard for most to want to take on. If you love these earrings, but don't love the crafting component - you can always splurge for the original that is available for sale here: https://rebeccaderavenel.com/

If anyone decides to give it a go - please post your comments below! Would love to hear how it worked out!

Holiday Decor Cont...

I have been chipping away at our holiday decorating moving towards Thanksgiving - I am early! This weekend the magnolia garland, ornaments and wreath arrived. They look beautiful! I ordered everything shown here from One Kings Lane (www.onekingslane.com) and purchased their shipping pass for $19.95 to get free shipping through 12/31.

Fresh wreath and a peek of garland

Fresh wreath and a peek of garland

First project - dip-dyed silver magnolia garland

First project - dip-dyed silver magnolia garland

I loved the idea of creating a dip-dyed silver garland to lay across the cabinet that my dad made for me. I store china in this cabinet and since we do not have a proper mantle it was a good place for some holiday dressing!

Marking off the tail to be dip-dyed

Marking off the tail to be dip-dyed

First, I draped the garland and marked off the tail for spray paint. This garland is 10' long and was $79 from One Kings Lane.

Krylon silver spray-paint from Amazon

Krylon silver spray-paint from Amazon

I used silver spray-paint, but you could use any color in the metallic family.

Giving the garland a good spray!

Giving the garland a good spray!

With the paper barrier in place, bring the garland to a well-ventilated area and give it a few good coats of metallic spray-paint!

Finished garland laid out to dry

Finished garland laid out to dry

Arranging the finished garland

Arranging the finished garland

I really like how this looks!

I really like how this looks!

I love how this garland turned out, but I also love how everything in these last pictures were made by me or my family! My mom made the sweater I am wearing, my dad made the cabinet, James and I made the woven leather chair (previous post) and I painted the monkey (previous post). Everyone including James has gotten into the crafting spirit! :)

Holiday Decor!

The holidays are coming and I couldn't be more excited about my holiday decor this year. I have ordered my materials for the projects I have planned and am sharing my list below for anyone who would like to get a head start.

10' strand of magnolia garland from the Magnolia Company

10' strand of magnolia garland from the Magnolia Company

89" Eucalyptus Garland from Knud Neilson Company

89" Eucalyptus Garland from Knud Neilson Company

30" Bunches Wreath, Magnolia Company

30" Bunches Wreath, Magnolia Company

10 gold glass Christmas ornaments

10 gold glass Christmas ornaments

20 Assorted glass Christmas ornaments

20 Assorted glass Christmas ornaments

I am planning to decorate our dining room table and living room with these greens and ornaments. The magnolia garland can be used to decorate a mantel. Since we do not have a mantel, I plan to put this beautiful garland on top of a cabinet, but you can effectively put it anywhere that you have a flat space - tabletop, bar, be creative!
My last item for this project is silver spray paint and some checkered ornaments. Looking forward to putting it all together!

Broken Dishes

I love the Lynn Chase Jungle Jubilee hand painted plates. I ordered a set of four off of Ebay for $30. Unfortunately, two arrived broken in half, so I am left with two for this post. :/ (USPS claim is in the works!). Today I am going to show you how to fix a plate with a chip. Note: this method should only be used to fix chips along the edge of a plate and not where food is served.

Love these plates. If you look closely, you can see some chips along the edges.

Love these plates. If you look closely, you can see some chips along the edges.

To fix the chips, you need: 1) 2-Part Epoxy: I used Devcon from Amazon, 2) Oil pastels, 3) Toothpicks

Here is a closeup of the chips

Here is a closeup of the chips

Another closeup...

Another closeup...

To fix the chips, color the oil pastel directly into the chip, mix the 2-part epoxy with a toothpick (equal parts) and spread the epoxy over your pastel work. I've seen an alternative method where the oil pastel is mixed directly into the epoxy and then applied. Coloring directly onto the chip worked best for me.

Prep work...

Prep work...

Complete! Three chips basically disappeared..

Complete! Three chips basically disappeared..

My color matching was not perfect because I was short on pastels.

Animals for the Kids! 2.0

I'm back with more animal watercolors since they have been so much fun. This little monkey was inspired by a photograph and is for Meghan's son Tommy.

This little guy is for Little Tommy. :)

This little guy is for Little Tommy. :)

These lambs are for Kristy and her baby girl!

I added a little extra pink to these lambs! :)

I added a little extra pink to these lambs! :)

My friends have been using Framebridge for framing. You order a kit on Framebridge to mail in your art, and they mail it back in your fame of choice! Pretty easy!

Meghan chose white on white...

Lauren chose gold for Pierce's giraffe. I love how they both turned out!

Lauren chose gold for Pierce's giraffe. I love how they both turned out!

Upholstery

I am in the process of having new cushions made for our living room chairs. Selecting upholstery has been the most challenging part of this project because I ordered all of my swatches online from www.patiolane.com and viewed nothing in person first!
Lots of trial, error and money spent for convenience!
I have narrowed down to three checks and plaid patterns; 1) Kravat Boyeson Dune, 2) Ralph Lauren Westcliff Tattersal Camel and 3) Kravat Couture Forever Young Wheat.
What is your favorite?

Moving from top left, clockwise: 1) Kravat Boyseon Dune ($104 / yd), 2) Ralph Lauren Westcliff Tattersal Camel ($107 / yd) and 3) Kravat Couture Forever Young Wheat ($132 / yd) - all from www.patiolane.com.

Moving from top left, clockwise: 1) Kravat Boyseon Dune ($104 / yd), 2) Ralph Lauren Westcliff Tattersal Camel ($107 / yd) and 3) Kravat Couture Forever Young Wheat ($132 / yd) - all from www.patiolane.com.

Coffee table from Molteni & Co. (45 degree, oak, yellow lacquer), rug from Crate & Barrel, Stools from Eric Trine

Coffee table from Molteni & Co. (45 degree, oak, yellow lacquer), rug from Crate & Barrel, Stools from Eric Trine

Leave comments in the box below!

Animals for the kiddies!

I will admit upfront that I was inspired by some original work in Restoration Hardware recently that this post gets its creative juice from. I am planning on giving the giraffe to my friend Lauren's baby Pierce and the elephant to a colleague who recently had a baby boy! If anyone is interested in purchasing, please send a request to kimtraut@yahoo.com and we can pick animals together. :)

Here I am with baby P and his favorite giraffe last summer. Time flies, he is running around riding lawnmowers now!

My watercolor supplies are basic for this project. I love Arches paper for projects like this.

My watercolor supplies are basic for this project. I love Arches paper for projects like this.

I sketched the animals using some photos of the RH work as a guide. You could also use coloring book pages for inspiration.

I sketched the animals using some photos of the RH work as a guide. You could also use coloring book pages for inspiration.

After practicing, I drew the giraffe on the watercolor paper in pencil.

After practicing, I drew the giraffe on the watercolor paper in pencil.

I painted the giraffe with watercolor paints and shaded in the spots.

I painted the giraffe with watercolor paints and shaded in the spots.

Last step was to add some defining lines in pen and sign off!

Last step was to add some defining lines in pen and sign off!

The elephant was the same process - sketch, paint and define with pen.

The elephant was the same process - sketch, paint and define with pen.

Layers of watercolor shade the drawn shapes

Layers of watercolor shade the drawn shapes

Pen is applied last so it does not run underneath the watercolor.

Pen is applied last so it does not run underneath the watercolor.

This was such a fun project. I can't wait to see these framed!

Jasper Necklace

A trip to the bead store landed me with a strand of blue Jasper stones and a project on my hands! I turned it around quick so I could wear this necklace to work this week. There are so many beautiful pieces of jewelry that you can buy in the store or make yourself for so much more fun!
To make this project at home you will need: 1) strand of beads (mine are blue jasper), 2) beading wire, 3) small silver spacer beads (if preferred), 4) 2 crimp beads, 5) a clasp, 6) needle nosed pliers (to crimp the crimp beads, and finish the necklace)

Jasper beads unfinished and fresh from the bead store

Jasper beads unfinished and fresh from the bead store

I chose a fun snake shaped clasp with silver spacer beads.

I chose a fun snake shaped clasp with silver spacer beads.

Beginning the strand

Beginning the strand

To begin the necklace, thread the tail of the beading wire up through the spacer bead, the crimp bead (very small), around the clasp and back down through the crimp and spacer bead. Using your needle nosed pliers, squeeze the crimp bead shut. This will hold the clasp in place and allow you to move forward stringing the beads.

Stringing the beads

Stringing the beads

I used some extra small silver spacers to fill in gaps that were caused by angled stones. This is optional and they are not evenly spaced, but they fill the gap where wire would otherwise show.

Finished product!

Finished product!

To finish the necklace repeat the same steps from how you began; string large spacer bead, crimp, clasp and back down through crimp and spacer bead. Use your needle nosed pliers to pinch the crimp shut and weave the remaining beading wire back through the strand, clipping when you are a few inches away from the clasp.

Rolling Apples

After a few days of chipping away, the apples are in a good place. As I mentioned in my last post, I have been working on a series of rolling apples on wooden panels. The panels are painted in acrylic and the apples are painted in oil. There are three panels total in this series.

I began with a swatch of all of the colors I started with

I began with a swatch of all of the colors I started with

Building the base of color with oil paint

Building the base of color with oil paint

I worked on all of the panels together so they would be consistent

I worked on all of the panels together so they would be consistent

Three panels making progress

Three panels making progress

I wanted a playful coloring book look, so I painted dark green oil paint around each apple to define them.

I wanted a playful coloring book look, so I painted dark green oil paint around each apple to define them.

I will be posting these on my main site soon once they dry (likely a week from now!). In the meantime, I have a great jewelry project coming up for the next post!

Apples

I am working on a series of paintings on plywood panels. This time I am planning on using a mix of oil and acrylic; acrylic base with oil on top. I am early in the process but am planning to paint 3 panels that include a series of rolling green apples.

Early planning stages - sketching apples

Early planning stages - sketching apples

Preparing the panels with gesso.

Preparing the panels with gesso.

:) To be continued....

James Chris

My dad cut me a bunch of plywood panels and I have been so excited to show you all what I have been working on to turn these panels into art! The flights were cancelled this weekend due to a tornado watch (in New York!) and our 4th of July plans were off, so I spent the time finishing up this painting I have been working on and sourcing some inspiration for my next project with my friend Erin.

I prepared the plywood panels with a thick coat of Blick Gesso.

I prepared the plywood panels with a thick coat of Blick Gesso.

This was my first time working with oils since college and it was fun to get back into it.

This was my first time working with oils since college and it was fun to get back into it.

We've been going to a lot of museums lately and James always likes the portraits so I wanted to make him one of him.

We've been going to a lot of museums lately and James always likes the portraits so I wanted to make him one of him.

The oil takes forever to dry!

The oil takes forever to dry!

There may be a few more adjustments but I am going to let this dry for now.

There may be a few more adjustments but I am going to let this dry for now.

Beach Chic Leather Folding Chair - Woven Leather v2

This will likely be my last chair post, but I wanted to add this variation since it is slightly different than the first (see, Woven Leather Chair) and has a summer spin! I purchased this aluminum Telescope folding chair on Ebay for $44 and re-covered it in leather for an additional $100. I purchased the natural strap leather (4 oz / 5 oz) from Weaver and had them cut 2" strips.

Here is the Telescope aluminum chair from Ebay that I bought for $44

Here is the Telescope aluminum chair from Ebay that I bought for $44

First step is to disassemble the chair by unscrewing the canvas strips. Discard all but one from each direction to use as a template.

First step is to disassemble the chair by unscrewing the canvas strips. Discard all but one from each direction to use as a template.

We found it was easier to cut the strips down the middle and just turn the strip, vs. using the screwdriver.

We found it was easier to cut the strips down the middle and just turn the strip, vs. using the screwdriver.

Using a strip as a template, cut your leather strips - give an inch of extra room just in case.

Using a strip as a template, cut your leather strips - give an inch of extra room just in case.

Prep the leather strips with a coat of oil to make them easier to work with and kick-start the patina process.

Prep the leather strips with a coat of oil to make them easier to work with and kick-start the patina process.

After washing the chair down with soap and water, it looks much cleaner.

After washing the chair down with soap and water, it looks much cleaner.

Assembly in process - attach the leather strips just like the fabric was attached before.

Assembly in process - attach the leather strips just like the fabric was attached before.

Screwing each of the strips into place.

Screwing each of the strips into place.

Halfway done - ready for weaving!

Halfway done - ready for weaving!

Weave the straps across and secure to the frame, just like the chair was assembled initially.

Weave the straps across and secure to the frame, just like the chair was assembled initially.

IMG_6013.JPG
Finished product! Super comfy and beach chic - although, for sunny days only - do not get wet!

Finished product! Super comfy and beach chic - although, for sunny days only - do not get wet!

Please let me know if you have any questions by posting in the comments section below!